This is the companion web page for Chapter 2 of Photo Restoration KwikGuide. These pages are intended to support the book reader with example file downloads and tips, however they can be viewed by anyone. For information about purchasing the book see the Overview Page. |
||||||||||||||||||||||||||||||
| Note: This section was updated June 18, 2013 with a discussion on negatives and slides. See the bottom of the page |
||||||||||||||||||||||||||||||
Scanner Reviews We will review several scanners with real world activities encountered by the average user. This will include scanning color photos of various sizes, 35mm slides, and a variety of negatives. More on scanning negatives and slides in included at the end of this page. Speed of scan, quality, and ease of use will be recorded. First scanners to be reviewed will be:
For photo restoration purposes, we recommend as a mid-range (or greater) desktop scanner. There are low-end scanners available for less than $100, however with scanners you do get what you pay for. For quick scans that may be useful for web posting, the cheaper scanners may work fine. However, restoration requires high resolution and high quality. Mobile scanners will be reviewed as they do provide an advantage when traveling or visiting libraries or research centers. Some of them can produce very good scans. |
||||||||||||||||||||||||||||||
Epson Perfection v500 (Tested January 2013) We have used this model at PhotoTree.com for more than a year and are extremely pleased with it. At the time it was about $180. It replaced an eight year old Microtek scanner that cost well over $1,000 when new. This model has a separate set of scanning lights for slides and negatives. This is a big advantage as the scanner will have a much higher resolution for those areas than when scanning documents or photos. It has a letter size scanning bed with USB 2.0 interface. Prices (January 2013): B&H Photo, $148.95; Staples, $149.99. Epson Perfection v600 (Tested February 2013) We were disappointed in the performance of this scanner. It was generally faster than its sibling the V500, but still could not keep pace with the same-class Canon 9000F, and is still more expensive. It does come with Digital ICE technology which helps the quality of the scan, but we think this is usually imperceptible to the average consumer. Prices (February 2013): B&H Photo, $187.76; Staples, $192.98. Canon CanonScan 9000F (Tested January 2013) This is a new acquisition in December 2012. It is in the same class as the Epson v500 with much of the same features and expectations. It has a letter size scanning bed with USB 2.0 interface. This also has separate lights in the lid for film and negatives. This scanner has almost instant start up and is quicker scanning photographs than the v500. One important thing for PhotoTree is the results when scanning thick photographs like cabinet cards. The 9000F left fewer shadows around the edge of the card. Both Epson scanners left objectionable shadows that needed to be selected manually in Elements and then cut. Price (February 2013): B&H Photo, $149: Amazon.com, $149.00 Flip-Pal Mobile Scanner (Tested January 2013) Review of this device is not meant to be a head-to-head comparison to the flatbed scanners. This type of device is a secondary scanner for people that need to capture digital scans when away from their office or home. With respectable resolution and surprising quality, it can produce images worthy of restoration. The Flip-Pal scanner has a 4" x 6" scan window, and scans the whole area regardless of actual image placed on the window. Cropping may be required. It will scan at 300 or 600 DPI, and saves the image as a JPG file on a SD card. Scan Tests
* The Flip-Pal Mobile device scans directly to a SD Card. It does not interface to Elements. Time in seconds, from when 'scan' is selected until image appears in Photoshop Elements version 11. Preview and selection was already complete, and scan was imported into Elements. Epson and Canon scanners were connected to a PC via USB 2.0 using the vendor supplied TWAIN drivers. |
||||||||||||||||||||||||||||||
Results We knew from daily experience that the Canon 9000F was faster than the Epson v500. But we were surprised at the real difference in scan time. We had already shifted high volume scanning to the Canon before the test had actually been run. Epson lists the v600 as having 'No Warm-up Time', which may give it the edge over the v500. Our Choice We have switched all scanning to the Canon 9000F – time is money. The 9000F saves time, and our perception of quality is equal to the Epsons tested. The Epson scanners are fine devices and we used them with great satisfaction until we found the speed the 9000F delivered. If you only use a scanner occasionally, and already have one there is need to spend the money on changing to another. Full disclosure: PhotoTree has no relationship or investment with Epson or Canon corporation. |
||||||||||||||||||||||||||||||
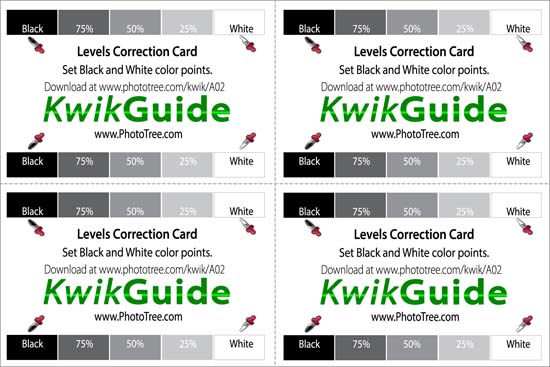
Black Point, White Point Card This card is used in scanning to set the White Point and Black Point of an image. This is explained in the scanning section. When scanned along with your image, you can tell Elements exactly what white looks like and what black looks like. This may sound obvious already, but it actually isn't. Each scanner will have a variation in how true it scans an image. The scanned file may be slightly lighter or darker than the original. In color photos the colors may be off a little. By pointing out to Elements the precise black and white values, Elements will 'fix' this scanner deficiency for this image. After setting the White/Black points, the scan area which includes this card should be cropped away. The Levels command will give you the chance to fix the off-coloring. See the explanation along with the Black/White Scan Card.
Download the print-ready version here. This download is formatted for a 4x6 print. It should be printed by a photo service (many discount stores, etc.) as a glossy print. Note: There are actually four cards on a print for your convenience. Cut them apart, and save them, as they are easily misplaced. Scanning and Restoring Negatives and Slides Restoring negative and slides uses the same processes as restoring prints – after the negatives and slides are scanned. But first a little background on slide and negative scans. Film (negative and slides) scanners come in two flavors: flatbed scanners and dedicated film scanners. Film scanners only scan film and are generally used by businesses, professionals, and serious photo enthusiasts. We won't cover film scanners here - if you have one you are probably an expert on the subject anyway. We will concentrate on consumer-level flatbed scanners. Older (or inexpensive) Flatbed Scanners Older (and inexpensive) flatbed scanners without dedicated and separate scanning lights will not scan slides well, no matter what the product literature says. What does this mean? The older scanners use the same set of lights and sensors for film as for prints - these are usually in the bottom of the scanner. These sensors generally do not have the resolution to scan film, and are not optimized for the transparent nature of film. New Scanners with Dedicated Sensors Newer scanners (last several years) have an additional set of lights and sensors in the lid of the scanner for scanning film. These sensors are optimized for film scanning and are very high resolution. You need to scan at a much higher resolution for film than prints. For example, a 35mm slide needs to be scanned at a minimum of 2400 DPI for good results. However, this is on the low end, and is standard for most economical services. If you are scanning for restoration or for big enlargements, 3600 or even 4800 would be better. The operation of scanning films is slightly different t than scanning flat pictures. Usually the inside of the lid must be removed to reveal the additional set of lights and scanners. This inside cover usually snaps out. Check your scanner manual for the steps. Film Trays Several film trays are included with your new scanner that hold different slide or negative sizes.
There is one important size missing from both brand of scanners - that is the very popular 127 size that was used throughout the 1940s, 50s, and 60s. Most families will have these size negative from their ancestors. These negatives are physically about 2" wide and do not fit into any of the staandard trays. Odd Size Negatives. There are a couple ways to scan negatives that don't fit into any trays. 1) Lay them on the flatbed glass. 2) Make a custom negative holder - easier than you might think. Lay Negative on Glass - The standard trays do not increase the quality of the scan, they just make it easier to lay the negatives or slides on the scanner, keeping them straight or level. They also keep the negative from touching the glass which could have dust or other contaminants on it. So, if you have odd-size negatives, just clean you glass well, place the negative as straight as you can and scan away. Make a Custom Holder I've made custom holders out of card stock, you could use photo backing, mat board, or any stiff paper product. I use three pieces and will walk through making a 127 size holder. Instructions and illustrations to make a custom holder will follow shortly. Scanner Settings Your scanner will have settings for negatives (Monochrone or color) and slides. These may be in the advance, custom, expert, professional setting mode depending on your scanner. It will then convert the scanned image into the correct positive image. One note on scanning black and white negatives. You may have the choice of scanning them as Grayscale, which is their natural look and the scanner will force the image to be all black and white, or you can scan the black and white negative as color. The results will be different from scanner to scanner, but you will sometimes get a nice browntone look. Try both and see what you like. More to Come
|
||||||||||||||||||||||||||||||